A Spring REST and H2 database application on the Raspberry Pi
Java on Raspberry Pi
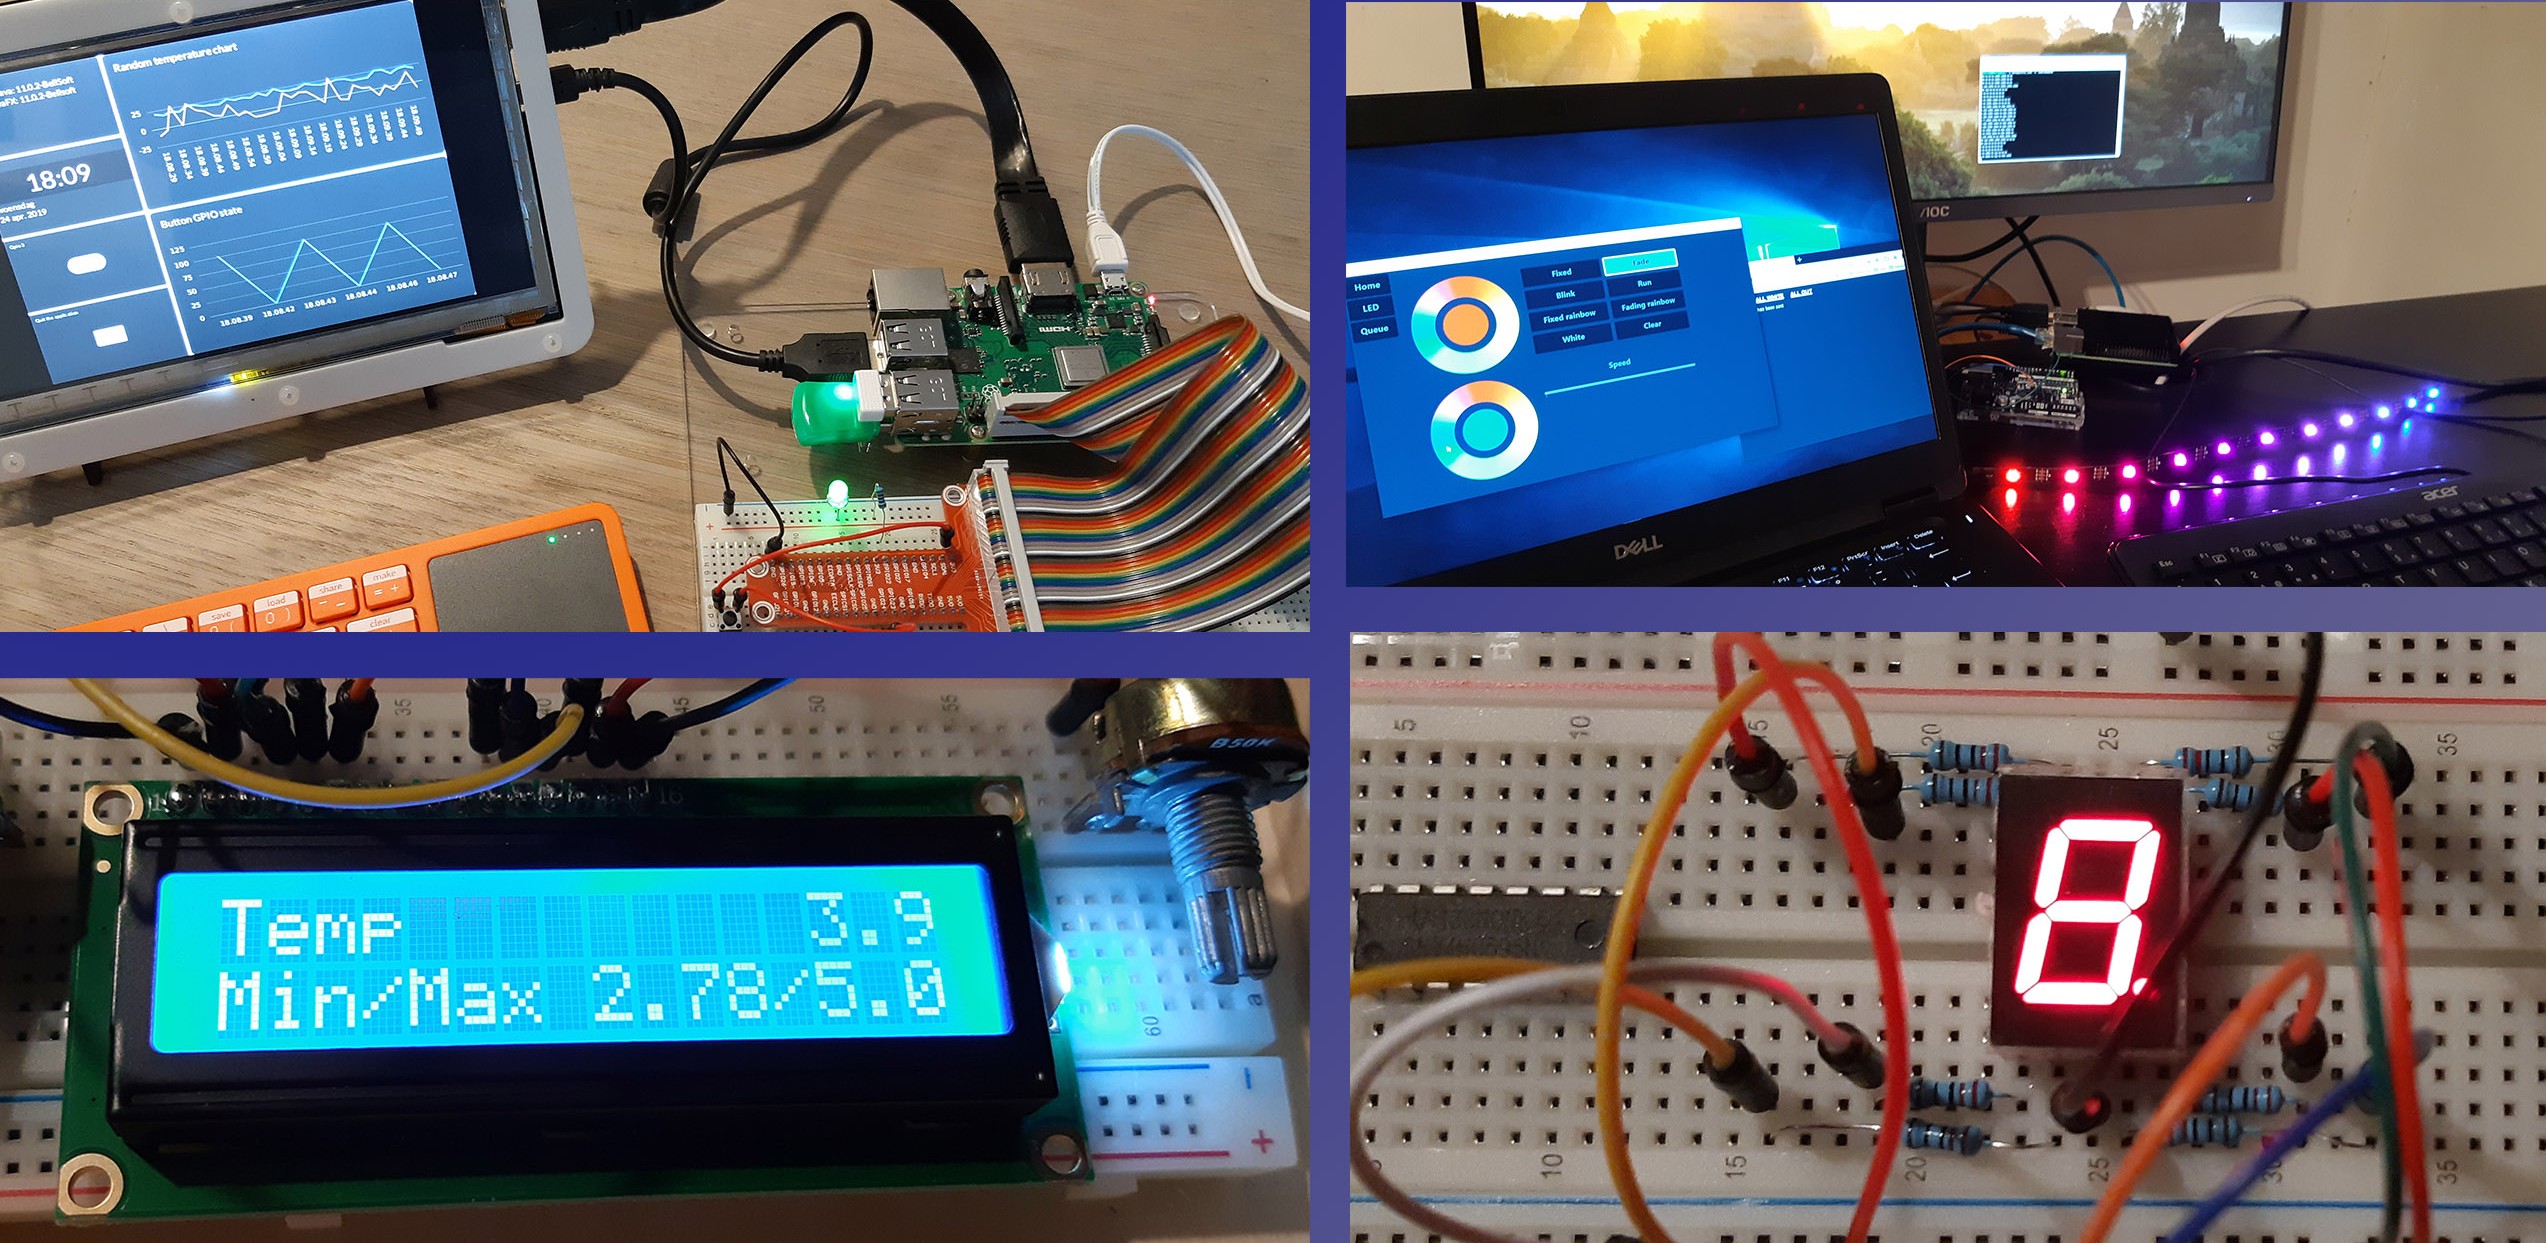
The “Pi” in the name of the Raspberry Pi refers to Python, but as a Java developer I love to know and experiment with the various Java frameworks I also use at work. Spring is the main one, and I wanted to develop a proof-of-concept application which provides REST API’s to store and retrieve sensor data with a database back-end on the Raspberry Pi.
This is an extract of an example application from my book “Getting Started with Java on Raspberry Pi” in which you can find a lot more info an examples about Java, Raspberry Pi, Pi4J…
The code
The sources of this application are available in the GitHub JavaOnRaspberryPi repository which contains all the examples, links, schemes, etc. from my book.
The H2 database we will be using is a full-Java-solution which doesn’t need any additional installation but is fully part of the application itself.
There is a lot of “discussion” whether you should use H2 only for testing or can use it in production. In recent years it has evolved into a very stable database solution which in my opinion is a very good choice for embedded projects.
JPA is the persistence specification used to “communicate” with the database. It helps you to define which objects (entities) can be stored in a database in which structure (tables).
Spring Initializr
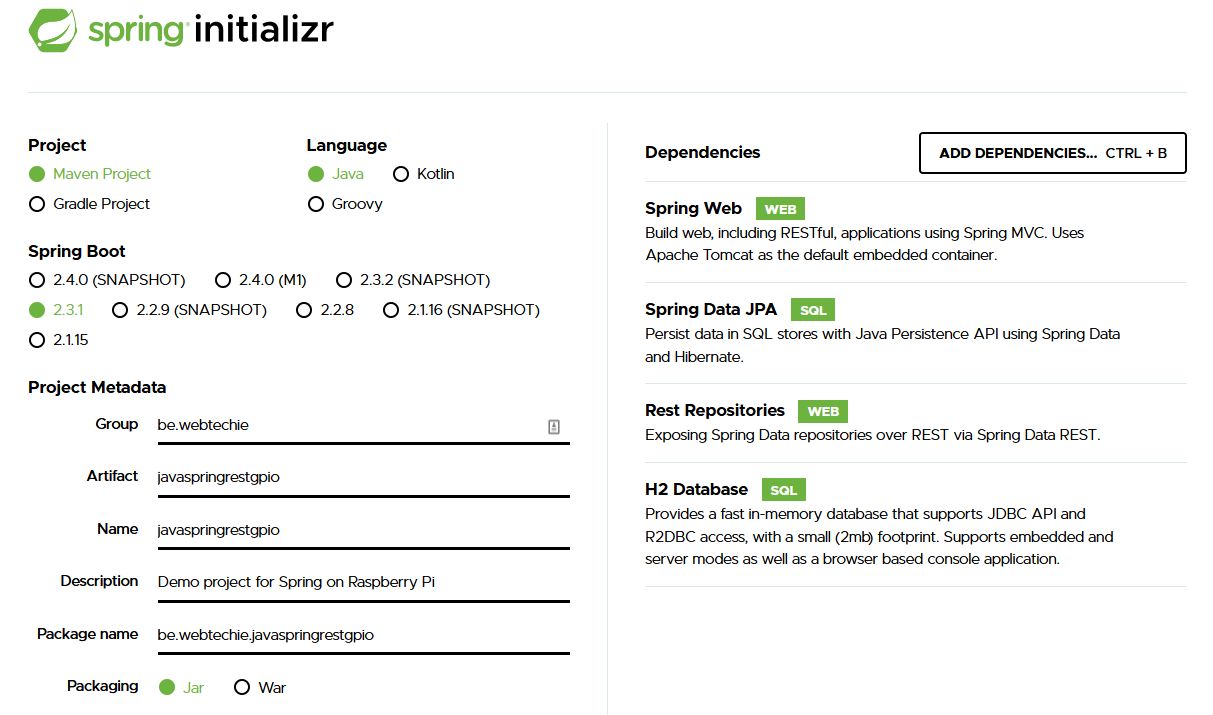
Thanks to the Spring Initializr website we can get started easily with a Spring Boot project. Select all options for the most recent Java application and add
- Spring Web
- Spring Data JPA
- Rest repositories
- H2 Database
This will create a ZIP download for you which contains a full Maven project you can open in your IDE and further extend.
Creating the database entities
The main advantage of a JPA is the fact we can define our database structure in code. We don’t need to create and define tables; the code will take care of this.
This is the model we want to use in our example:
- Sensor
- Unlimited number of measurements per sensor
Which looks like this in a diagram:
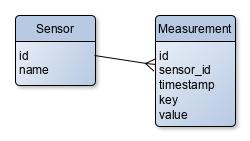
This can be achieved by adding two classes to our project in a package (directory) “entity”. First, we create one for the sensors called “SensorEntity.java”. As you can see this code contains a lot of “annotations” (start with @) which will help the framework to map the code to the database.
/**
 * Maps a database entity from the table SENSORS to a Java object.
 * The ID is marked as the unique identifier.
 */
@Entity
@Table(name = "SENSORS",
    uniqueConstraints={@UniqueConstraint(
        name="UN_SENSOR_ID",
        columnNames={"ID"})})
public class SensorEntity {
    /**
     * Auto-generated identifier to have a unique key for this sensor.
     */
    @Id
    @GeneratedValue
    private Long id;

    /**
     * Name of the sensor, a required value.
     */
    @Column(nullable = false)
    private String name;

    /**
     * Relationship between the sensor and a list of measurements.
     */
    @OneToMany(
            mappedBy = "sensorEntity",
            cascade = {CascadeType.MERGE},
            fetch = FetchType.LAZY
    )
    private Set<MeasurementEntity> measurements = new HashSet<>();

    ...
}
The same way, we add a class “MeasurementEntity.java”
/**
 * Maps a database entity from the table MEASUREMENTS to a Java object.
 * The ID is marked as the unique identifier.
 */
@Entity
@Table(name = "MEASUREMENTS",
    uniqueConstraints={@UniqueConstraint(
        name="UN_MEASUREMENT_ID",
        columnNames={"ID"})})
public class MeasurementEntity {

    /**
     * Auto-generated identifier to have a unique key for this sensor.
     */
    @Id
    @GeneratedValue
    private Long id;

    /**
     * Relationship between the measurement and its sensor.
     */
    @ManyToOne
    @JoinColumn(
        name = "SENSOR_ID",
        nullable = false,
        foreignKey = @ForeignKey(name="FK_MEASUREMENT_SENSOR"))
    private SensorEntity sensorEntity;

    /**
     * Timestamp of the measurement.
     */
    @Column(nullable = false)
    private long timestamp;

    /**
     * Key for the type of measurement, e.g. "temperature", "distance"...
     */
    @Column(nullable = false)
    private String key;

    /**
     * Value of the measurement
     */
    @Column(nullable = false)
    private double value;

    ...
}
These two classes are all we need to define the database tables and how data needs to be stored!
Storing data in the database
We will do this with two repository-classes and minimal code! Let’s start again with the Sensors and create a package “repository” and a file “SensorRepository.java”. By extending from “JpaRepository” we get most CRUD-functionality (Create, Read, Update and Delete) for free, and only need to define the additional methods we need. By using the same parameter-names as the values in the entities, Spring will handle the functionality for us!
@Repository
public interface SensorRepository extends JpaRepository<SensorEntity, Long>{
    Page<SensorEntity> findAll(Pageable pageable);

    List<SensorEntity> findAllByName(String name);

    SensorEntity findById(@Param("id") long id);
}
“MeasurementRepository.java” is even smaller:
@Repository
public interface MeasurementRepository extends
    JpaRepository<MeasurementEntity, Long>{
    Page<MeasurementEntity> findAll(Pageable pageable);
}
Adding the REST-services
Now let’s expose our database functionality with REST-services so anyone can read and write data from and into the database!
Create a package “resource” and a file “SensorResource.java”. In here we define three services which will be available on an URL:
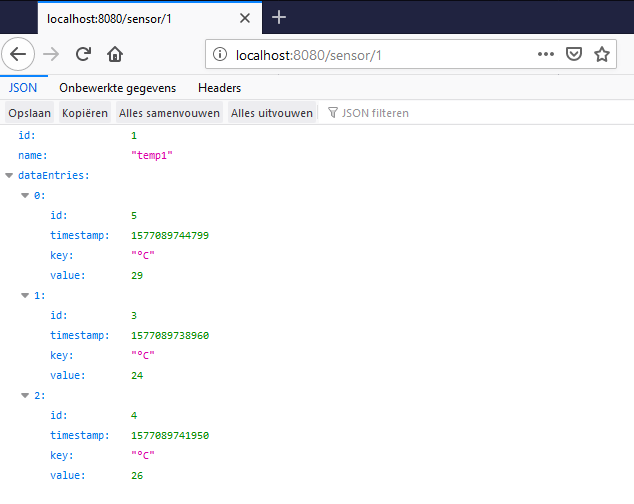
- GET localhost:8080/sensor: all the sensors from the database
- GET localhost:8080/sensor/id: one sensor from the database
- POST localhost:8080/sensor: add a sensor with the given name, after checking this name isn’t already used
All this is done through the SensorRepository we created before:
@RestController
public class SensorResource {
    @Autowired
    private SensorRepository sensorRepository;

    @GetMapping("/sensor")
    public List<SensorEntity> retrieveAllSensors() {
        return sensorRepository.findAll();
    }

    @GetMapping("/sensor/{id}")
    public SensorEntity retrieveSensor(@RequestParam long id) {
        return sensorRepository.findById(id);
    }

    @PostMapping("/sensor")
    public ResponseEntity createSensor(@RequestParam String name) {
        List<SensorEntity> sensorEntities = sensorRepository.findAllByName(name);

        if (sensorEntities.size() > 0) {
            return ResponseEntity.status(HttpStatus.BAD_REQUEST)
                .body("There is already a sensor with the name: " + name);
        }

        SensorEntity sensorEntity = new SensorEntity(name);
        sensorRepository.save(sensorEntity);
        return ResponseEntity.ok(sensorEntity);
    }
}
We need to do the same for the measurements to provide these URLs:
- GET localhost:8080/measurement: all the measurements from the database
- POST localhost:8080/measurement: add a measurement for the given sensor ID, key and value, after checking the given sensor ID is defined in the database:
@RestController
public class MeasurementResource {
@Autowired
private SensorRepository sensorRepository;
@Autowired
private MeasurementRepository measurementRepository;
@GetMapping("/measurement")
public List<MeasurementEntity> retrieveAllMeasurements() {
return measurementRepository.findAll();
}
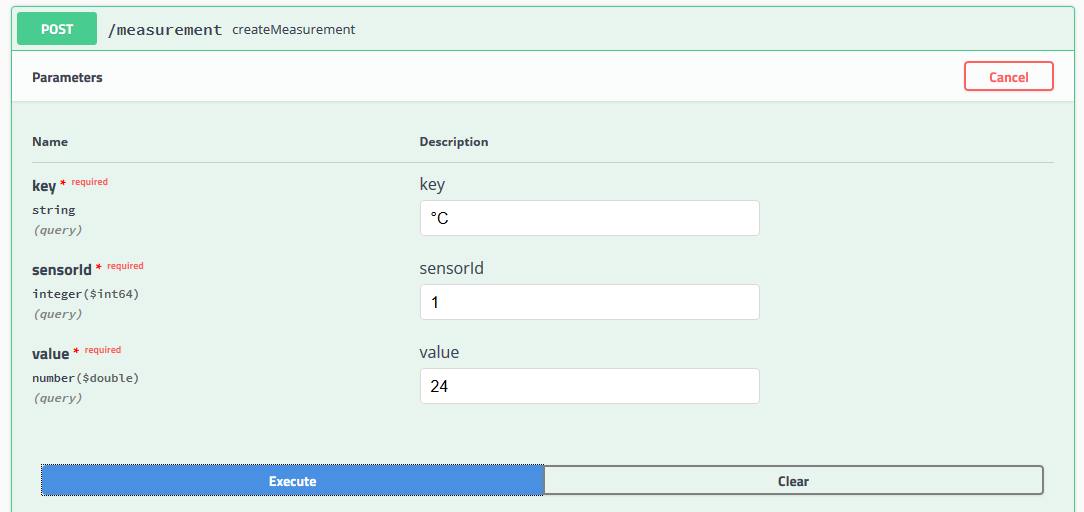
@PostMapping("/measurement")
public ResponseEntity createMeasurement(
@RequestParam long sensorId,
@RequestParam String key,
@RequestParam double value) {
SensorEntity sensorEntity = sensorRepository.findById(sensorId);
if (sensorEntity == null) {
return ResponseEntity.status(HttpStatus.BAD_REQUEST)
.body("No sensor defined with the ID: " + sensorId);
}
MeasurementEntity measurementEntity = new MeasurementEntity(
sensorEntity, System.currentTimeMillis(), key, value);
measurementRepository.save(measurementEntity);
return ResponseEntity.ok().build();
}
}
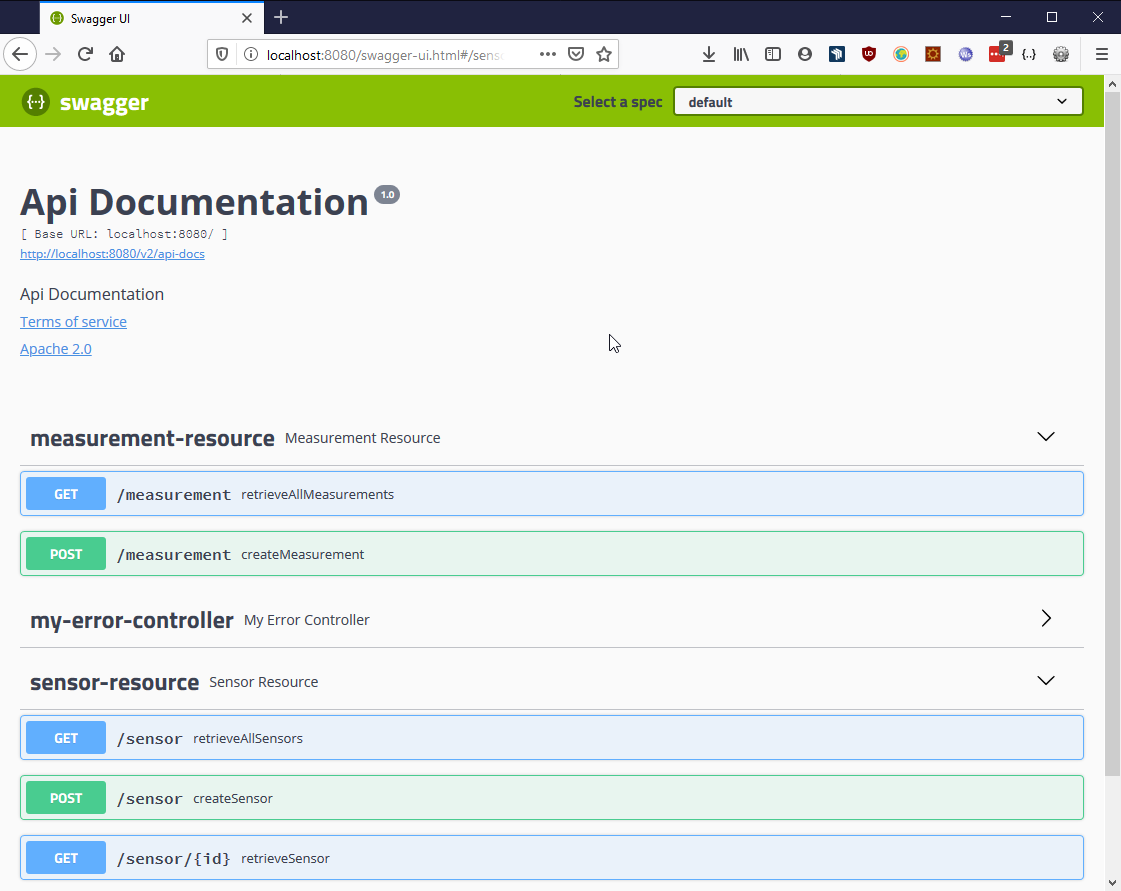
Running the application and using the REST-services
Testing on PC
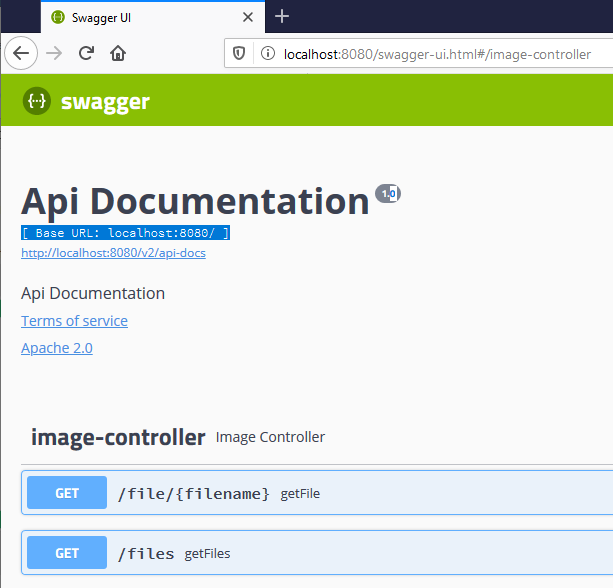
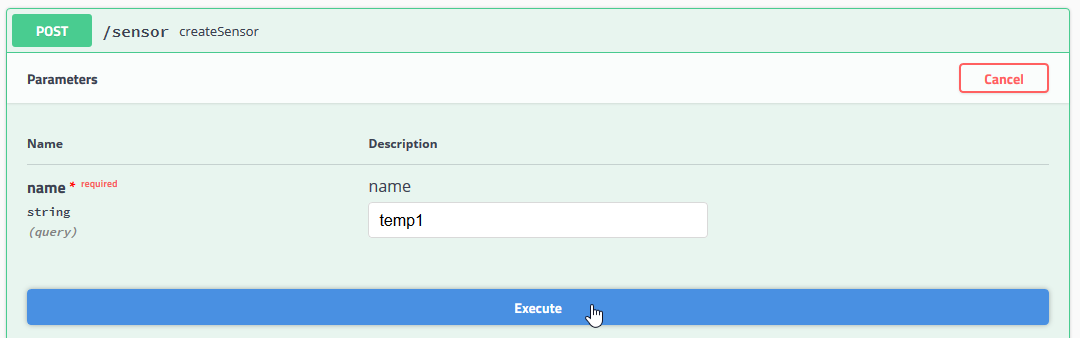
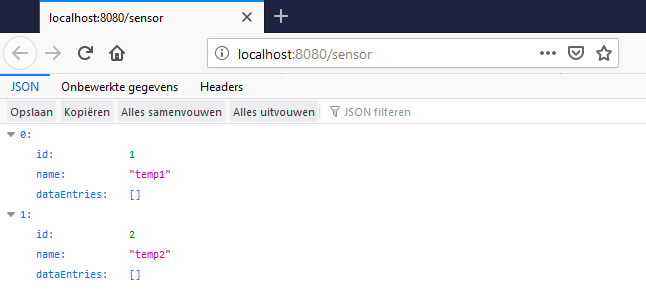
Let’s try it out! Hit run on the main function in “JavaSpringRestDbApplication.java” and browse to http://localhost:8080/swagger-ui.html. By using the Swagger interface we can create some sensors by clicking on “POST /sensor” and “Try it out”. You can see the created records by trying out the GET’s for “/sensor” and “/sensor/{id}”, but also by browsing directly to http://localhost:8080/sensor. Check the screenshots for examples of stored data.

Checking the data in H2-console
If you add an additional setting in “src > main > resources > application.properties” something magical happens. Out of the blue, our application is extended with a full database browser!
spring.h2.console.enabled=true
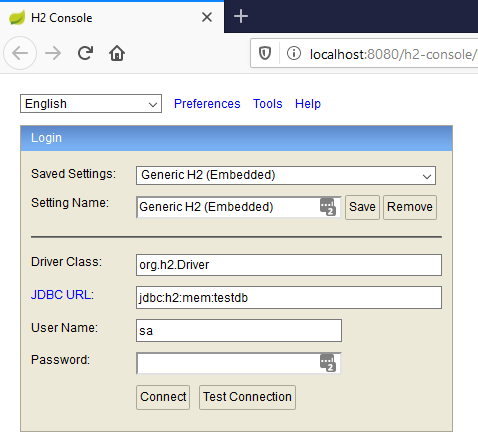
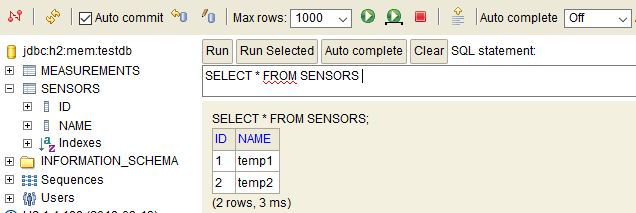
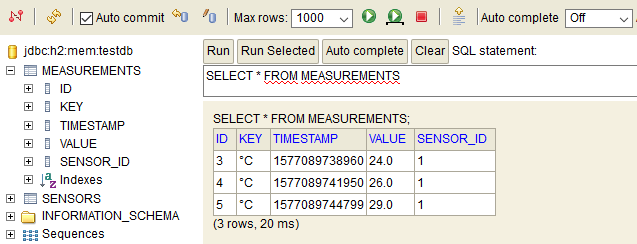
Restart your application so the new setting is applied. Because H2 by default stores everything in memory, our test data is gone, and we need to first generate some again with Swagger as described before. Now browse to http://localhost:8080/h2-console and make sure “jdbc:h2:mem:testdb” is used as “JDBC URL”. In the screenshots below you can see the database structure as we defined it in our code for both tables and check the data.
Configuration to run on the Raspberry Pi
Our application works on PC, let’s prepare the Raspberry Pi now. Spring will look for an application.properties file in the config directory at startup and if found, will use that one instead of the one included in the jar. Let’s use this functionality to reconfigure the application to use a file-database instead of in-memory, so the data is not lost when restarting.
We will make a directory for the application and add the properties like this:
$ mkdir /home/pi/dbapp
$ cd /home/pi/dbapp
$ mkdir config
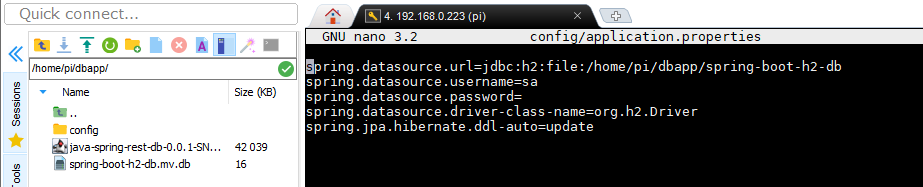
$ nano config/application.properties
spring.datasource.url=jdbc:h2:file:/home/pi/dbapp/spring-boot-h2-db
spring.datasource.username=sa
spring.datasource.password=
spring.datasource.driver-class-name=org.h2.Driver
spring.jpa.hibernate.ddl-auto=update
Build the application on your PC to a jar with “mvn clean package” and copy “java-spring-rest-db-0.0.1-SNAPSHOT.jar” from the “target” directory to your Pi in the “/home/pi/dbapp” directory.
In this screenshot, you also see the created database file “spring-boot-h2-db.mv.db” as defined in the properties file. When adding data via Swagger, you will see the size of this file grow.
Running the application gives the expected output similar to the one on the PC:
$ java -jar java-spring-rest-db-0.0.1-SNAPSHOT.jar

  .   ____          _            __ _ _
 /\\ / ___'_ __ _ _(_)_ __  __ _ \ \ \ \
( ( )\___ | '_ | '_| | '_ \/ _` | \ \ \ \
 \\/  ___)| |_)| | | | | || (_| |  ) ) ) )
  '  |____| .__|_| |_|_| |_\__, | / / / /
 =========|_|==============|___/=/_/_/_/
 :: Spring Boot ::        (v2.1.8.RELEASE)

Starting JavaSpringRestDbApplication v0.0.1-SNAPSHOT on raspberrypi with PID 4557
    (/home/pi/dbapp/java-spring-rest-db-0.0.1-SNAPSHOT.jar
    started by pi in /home/pi/dbapp)
No active profile set, falling back to default profiles: default
Bootstrapping Spring Data repositories in DEFAULT mode.
Finished Spring Data repository scanning in 465ms. Found 2 repository interfaces.
...
Tomcat started on port(s): 8080 (http) with context path ''
Started JavaSpringRestDbApplication in 63.416 seconds (JVM running for 67.637)
The big difference is this last line when compared to my development PC:
Started JavaSpringRestDbApplication in 5.452 seconds (JVM running for 7.338)
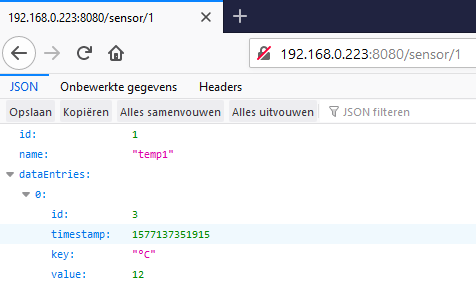
Indeed you’ll need to take into account this application needs a longer start-up time on the Pi. But as soon as it runs, you can access Swagger and the REST-services from any PC within your network on the IP address of your Pi, in my case 192.168.0.223:
Conclusion
Just a basic example with two tables, but it shows you how quickly and with minimal code, a database application can be built. The REST-services are available to all your devices who can connect to your Raspberry Pi via the network so they can store data in one central place and/or can read that data.
The JSON data provided by the REST-services can be used by all different kinds of devices or applications to visualize the results. On the Elektor website you can find a nice example of a microcontroller doing this to show JSON data on a screen.
Running Java and Spring on the Raspberry Pi is only one example of the versatility of this small, inexpensive but very powerful machine! For more fun with #JavaOnRaspberryPi, check out my book “Getting Started with Java on Raspberry Pi”.